How to Sync Your Google Calendar with SimplyMeet.me: A Guide
In the age of remote work and digital offices, managing your time effectively has never been more crucial. With an endless stream of meetings, it’s easy to get overwhelmed and double-book yourself. This is where SimplyMeet.me steps in. Syncing your Google Calendar with SimplyMeet.me not only simplifies your scheduling process but also ensures you never face the embarrassment of double bookings. Bear in mind that Google Calendar is just one of the many calendar integrations we have available. Let’s walk through how to integrate your Google Calendar with SimplyMeet.me in a few simple steps.
Step 1: Connect Your Online Calendar
Before you can utilise the full potential of SimplyMeet.me, you need to connect it to your Google Calendar:
1) Log in to your SimplyMeet.me account.
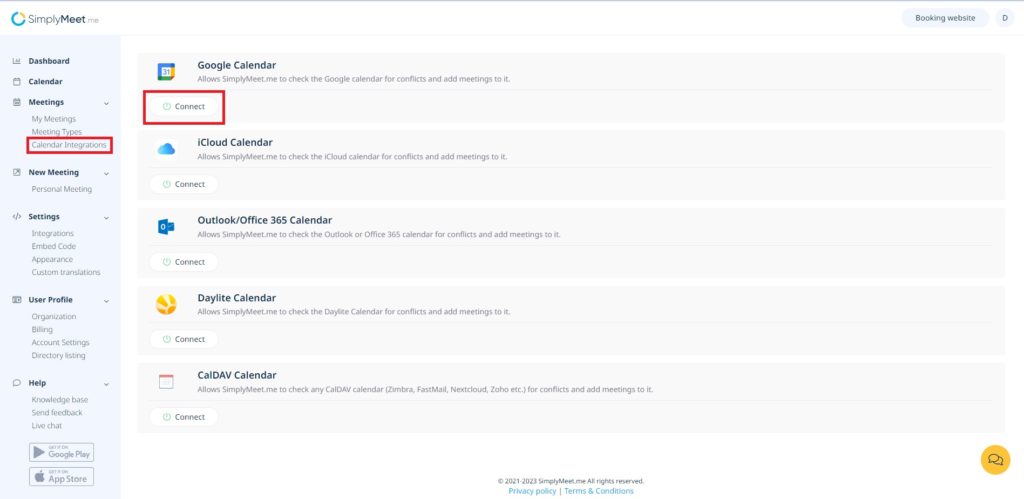
2) Head over to the ‘Calendar Integration’ page under the ‘Meetings’ tab on the menu.
3) Select ‘Google Calendar’ from the list of available calendar types and click on the ‘Connect’ button.
4) Follow the prompts to allow SimplyMeet.me access to your Google Calendar.
5) Once connected, you’ll see the details of your now-linked calendar. Here, choose which specific calendars within your Google Calendar SimplyMeet.me should monitor for conflicts.
By doing this, SimplyMeet.me will be able to read your availability and ensure your meeting slots are booked without any overlaps.
Step 2: Customise Your Meeting Types
Creating a meeting type that reflects your availability is key to efficient scheduling:
1) From the dashboard, navigate to the Meeting Types page.
2) You can edit the default meeting type or click on ‘Create a new meeting type’ to customise your availability.
3) If needed, specify which Google Calendars should be checked for each meeting type. Remember, this setting overrides the general calendar integration settings, allowing for more control over your scheduling.
This step ensures that your booking page reflects your real-time availability as per your preferences and prevents booking conflicts.
Step 3: Share Your Booking Page
With your Google Calendar synced and your meeting types configured, it’s time to share your personalised booking page:
1) Find the link to your scheduling page in the top right corner of your SimplyMeet.me dashboard.
2) This link will lead your invitees to a page that shows your availability according to the connected Google Calendar and the meeting type configurations.
Customise the default availability rules in your Meeting Type settings to suit your schedule, such as being unavailable on weekends or setting your working hours.
Step 4: Test Your Setup
To ensure everything is working seamlessly:
1) Open your SimplyMeet.me booking page link in a new browser tab.
2) Schedule a test meeting with yourself. This will give you a first-hand view of what your clients or colleagues will experience when they book a meeting with you.

Additional Customisations and Integrations
Make SimplyMeet.me truly yours by adding your branding to the mix:
- Use your own domain for a personalised SimplyMeet.me experience.
- Customise the scheduling page to align with your brand’s aesthetic.
- Integrate with various applications, including Microsoft Teams, to streamline your workflow and communication.
Conclusion
Integrating your Google Calendar with SimplyMeet.me not only enhances your productivity but also provides a professional and seamless scheduling experience for your clients. With this step-by-step guide, you’re now equipped to take control of your appointments and make double bookings a thing of the past.
Ready to simplify your scheduling? Sync your Google Calendar with SimplyMeet.me today and experience the ease of managed appointments. Should you need any assistance, our support team is just a click away.

Comments
0 commentsNo comments yet